| Anycubic Photon Mono M7 Pro Specs |
Build Volume (LxWxH) |
XY resolution Online Review |
Screen Resolution / Size |
Typical Layer Height |
Tolerance |
|---|---|---|---|---|---|
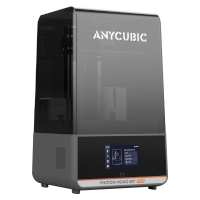 |
223x126x230mm | 16.8 x 24.8μm | 14K Monochrome 10.1" (13,320x5,120) |
0.01-0.05mm | ± 0.05mm |
| Phrozen Sonic Mini 8K Specs |
Build Volume (LxWxH) |
XY resolution Online Review |
Screen Resolution / Size |
Typical Layer Height |
Tolerance |
|---|---|---|---|---|---|
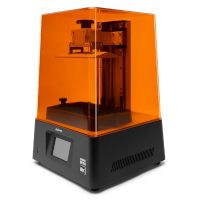 |
165x072x180mm | 22 x 22μm | 8K Monochrome 7.1" (7,500x3,240) |
0.01-0.03mm | ± 0.05mm |
¶ About Masked Stereolithography (MSLA)
Stereolithography, often simply called "resin printing," is a family of similar processes used for 3d printing finely detailed or difficult geometries in photopolymer resins. When exposed to UV light, these resins undergo a photo-initiated chemical reaction and cross-link permanently, becoming solid. Our machines use the MSLA process, in which UV light is passed through a high resolution LCD screen at the bottom of the resin tank. The LCD acts as a photo-mask by flashing an inverted image for each layer. As the image is flashed into the resin for a set number of seconds, the liquid in the tank solidifies, or "cures" at the locations where UV light is allowed to pass through. Since the light from the LCD is projected through a clear film at the bottom of the resin tank, the build plate starts at the bottom of the resin tank, pressed against the LCD and film, so that the first layer adheres well to the build plate. For each subsequent layer, the build plate moves up slightly, slowly drawing the printed part out of the resin vat.
There are many resin formulations available, with varying properties. Often, these use a standard clear base resin and add colorants or modifiers to change the properties of the final product. Our standard resin offerings include standard grey, clear, and flexible resins.
Advantages:
- Resin is the highest resolution printing process we have available in the RPS, with sub-50 micron resolutions possible, depending on the geometry and orientation of the part.
- Supports are still needed, but due to both the small layer-heights used, and the light support provided to parts being printed within the resin tank, fewer contact points are required with resin prints, meaning much less cleanup on most parts.
- Unlike filament printing, the strength of resin parts is fairly isotropic, and in most cases, Z layer strength is not detectably weaker than in the X or Y axes.
- Resin prints are solid internally by the nature of the manufacturing process. This yields heavier and stronger parts than filament printing in almost all cases.
- Resin prints are a "photo-setting" plastic, meaning that once the are solidified, they will not "melt", even in the presence of reasonably high heat. However, it's important to note that they still can warp and deform under moderate to high heat loads. Make sure to look up the HDT on your specific resin to ensure it meets your needs.
- Resin prints are generally watertight, though still not suitable for highly-pressurized applications.
- A wide variety of resins are available, with many different mechanical properties and specialty colors.
Disadvantages:
- Resin is more expensive than most filaments.
- Due to the fumes and chemicals involved in resin printing, PPE of varying types are either required or recommended. Some individuals may have a contact allergy to resins, or be sensitive to the smell of resins used in 3d printing. If this is the case, please let us know, and either have a partner perform resin printing processes for you, or work with RPS staff to find an alternate solution for post-processing your parts.
- Since resin prints are inherently solid, it is not possible make light-weight or strength-adjusted versions of your parts without changing the geometry, as it is with filament printing.
- Resin printing is not as beginner-friendly as filament printing is, and requires much more stringent cleaning and post-processing to achieve satisfactory results.
- There is no such thing as a "food-safe" resin. Never use any type of resin in food-contact applications.
- Most MSLA resins have a very short shelf-life, and must be used within 4-6 months, or disposed of. This problem is made worse by the fact that resins are not environmentally friendly or easy to dispose of in most places.
¶ Usage Instructions
¶ Slicing
To prepare your 3D models for use in our machines, please follow the instructions for the installation, setup, and usage of Lychee on the following page: Lychee
¶ Post Processing
Required PPE:
- Latex or Nitrile gloves
![]()
Once the print has concluded, allow the part and build plate to drip dry for a few minutes, then extract the build plate from the machine. Hold the build plate over an open cleaning vat of isopropyl alcohol, and scrape or flex the build plate to pop your part(s) loose. Run the part through the designated rinse cycle, then place on the drying rack and allow to dry completely. If needed, use the tools available in the RPS to remove any supports or strings remaining on the print. Finally, place the part in the UV curing oven, and run through the designated curing cycle for the resin used. If you need assistance, RPS staff are always present to help with advice! Please ensure that you return hand tools to their proper locations, and place the build plate back into the machine for other users.